Collection de modèles au Point de croix
NOUVEAUTÉS
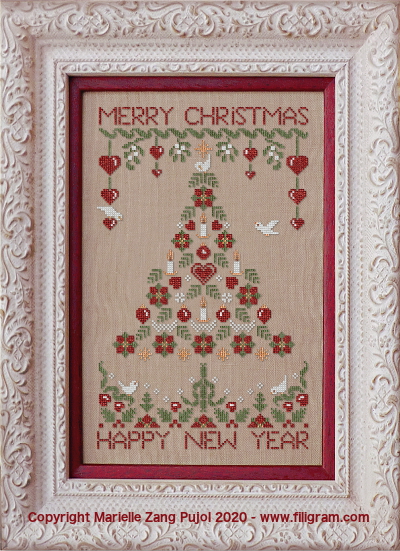
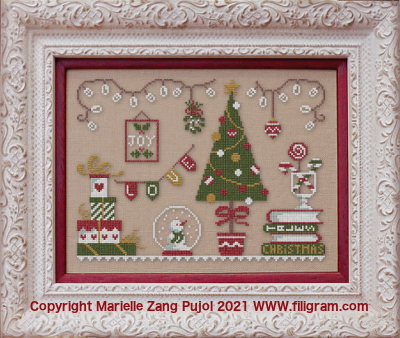
 ref F154- Green Christmas
Dimensions: 140 x 103 points- 6 couleurs
ref F154- Green Christmas
Dimensions: 140 x 103 points
Point de croix
Légende couleurs: The Gentle Art, Dinky-Dyes et DMC - 6 couleurs
Toile suggérée: Lin Belfast de Zweigart
Coloris: café au lait 309, vintage café au lait 3009, sable 323 ou lin naturel clair 53
 ref F144- Folk Art Christmas Tree
Dimensions: 108 x 175 points- 5 couleurs
ref F144- Folk Art Christmas Tree
Dimensions: 108 x 175 points
Point de croix
Légende couleurs: The Gentle Art, Dinky-Dyes et DMC - 5 couleurs
Toile suggérée: Lin Belfast de Zweigart
Coloris: café au lait 309, vintage café au lait 3009, sable 323 ou lin naturel clair 53
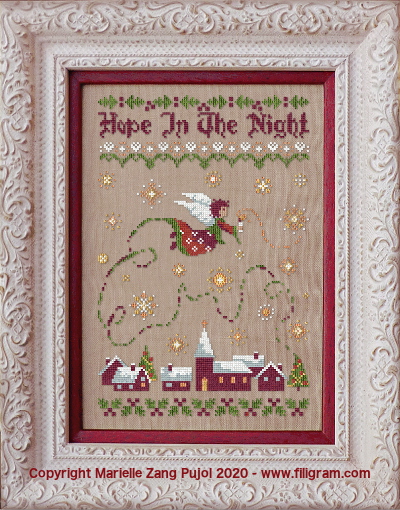 ref F145- Hope in the Night
Dimensions: 108 x 164 points- 8 couleurs
ref F145- Hope in the Night
Dimensions: 108 x 164 points
Point de croix
Légende couleurs: The Gentle Art, Dinky-Dyes et DMC - 8 couleurs
Toile suggérée: Lin Belfast de Zweigart
Coloris: café au lait 309, vintage café au lait 3009, sable 323 ou lin naturel clair 53
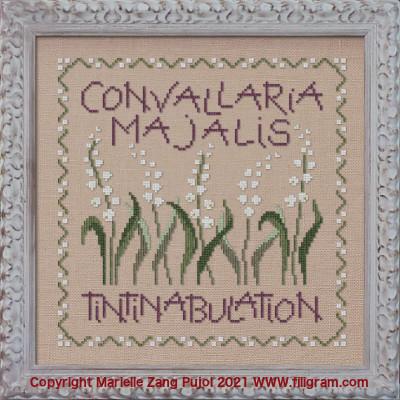 ref F148- Convallaria Majalis
Dimensions: 122 x 122 points- 7 couleurs
ref F148- Convallaria Majalis
Dimensions: 122 x 122 points
Point de croix
Légende couleurs: The Gentle Art, Dinky-Dyes et DMC - 7 couleurs
Toile suggérée: Lin Belfast de Zweigart
Coloris: café au lait 309, vintage café au lait 3009, sable 323 ou lin naturel clair 53
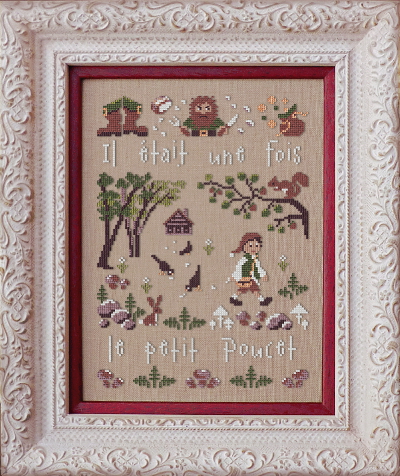 ref F142- Le Petit Poucet
Dimensions: 105 x 145 points- 8 couleurs
ref F142- Le Petit Poucet
Dimensions: 105 x 145 points
Point de croix
Légende couleurs: The Gentle Art, Dinky-Dyes et DMC - 8 couleurs
Toile suggérée: Lin Belfast de Zweigart
Coloris: café au lait 309, vintage café au lait 3009, sable 323 ou lin naturel clair 53
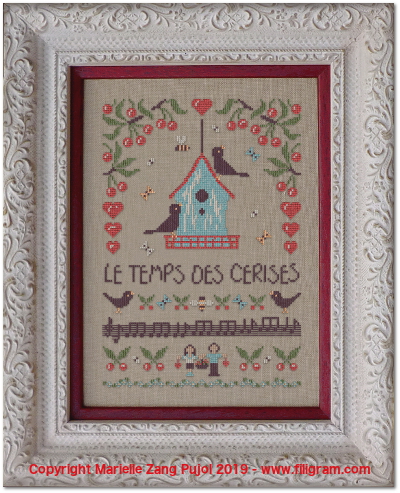 ref F136- Le Temps des Cerises
Dimensions: 107 x 156 points- 7 couleurs
ref F136- Le Temps des Cerises
Dimensions: 107 x 156 points
Point de croix
Légende couleurs: The Gentle Art, Dinky-Dyes et DMC - 7 couleurs
Toile suggérée: Lin Belfast de Zweigart
Coloris: café au lait 309, vintage café au lait 3009, sable 323 ou lin naturel clair 53
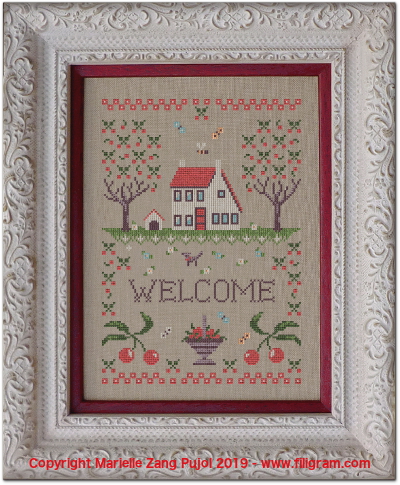 ref F138- Maison aux Cerises
Dimensions: 107 x 156 points- 8 couleurs
ref F138- Maison aux Cerises
Dimensions: 107 x 156 points
Point de croix
Légende couleurs: The Gentle Art, Dinky-Dyes et DMC - 8 couleurs
Toile suggérée: Lin Belfast de Zweigart
Coloris: café au lait 309, vintage café au lait 3009, sable 323 ou lin naturel clair 53
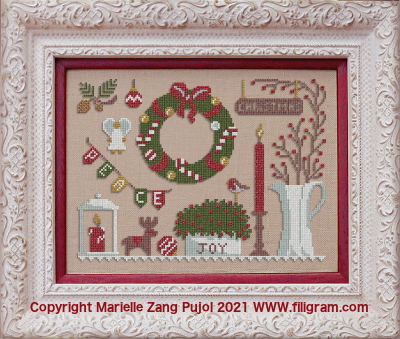
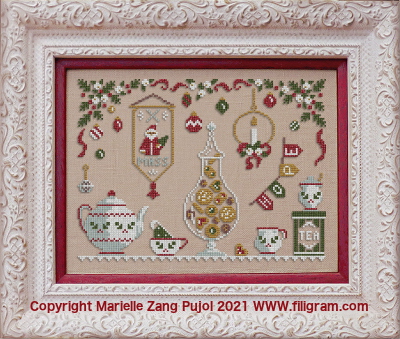 ref F153- Christmas Tea
Dimensions: 140 x 103 points- 6 couleurs
ref F153- Christmas Tea
Dimensions: 140 x 103 points
Point de croix
Légende couleurs: The Gentle Art, Dinky-Dyes et DMC - 6 couleurs
Toile suggérée: Lin Belfast de Zweigart
Coloris: café au lait 309, vintage café au lait 3009, sable 323 ou lin naturel clair 53
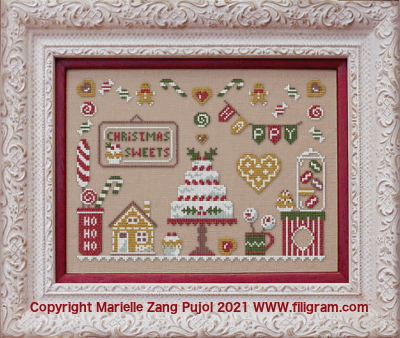 ref F152- Christmas Sweets
Dimensions: 140 x 103 points- 6 couleurs
ref F152- Christmas Sweets
Dimensions: 140 x 103 points
Point de croix
Légende couleurs: The Gentle Art, Dinky-Dyes et DMC - 6 couleurs
Toile suggérée: Lin Belfast de Zweigart
Coloris: café au lait 309, vintage café au lait 3009, sable 323 ou lin naturel clair 53
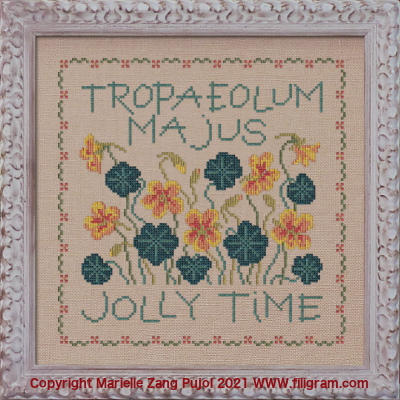 ref F150- Tropaleum Majus
Dimensions: 122 x 122 points- 7 couleurs
ref F150- Tropaleum Majus
Dimensions: 122 x 122 points
Point de croix
Légende couleurs: The Gentle Art, Dinky-Dyes et DMC - 7 couleurs
Toile suggérée: Lin Belfast de Zweigart
Coloris: café au lait 309, vintage café au lait 3009, sable 323 ou lin naturel clair 53
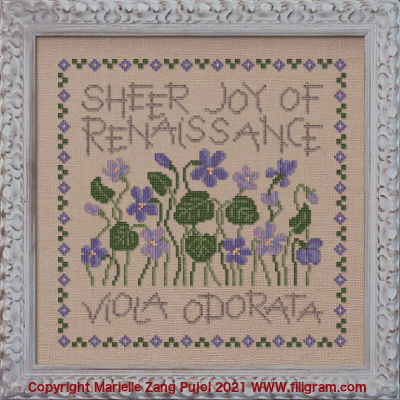 ref F147- Viola Odorata
Dimensions: 122 x 122 points- 7 couleurs
ref F147- Viola Odorata
Dimensions: 122 x 122 points
Point de croix
Légende couleurs: The Gentle Art, Dinky-Dyes et DMC - 7 couleurs
Toile suggérée: Lin Belfast de Zweigart
Coloris: café au lait 309, vintage café au lait 3009, sable 323 ou lin naturel clair 53
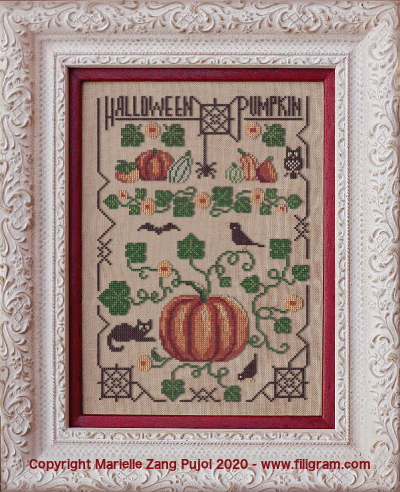 ref F143- Halloween Pumpkin
Dimensions: 105 x 152 points- 8 couleurs
ref F143- Halloween Pumpkin
Dimensions: 105 x 152 points
Point de croix
Légende couleurs: The Gentle Art, Dinky-Dyes et DMC - 8 couleurs
Toile suggérée: Lin Belfast de Zweigart
Coloris: café au lait 309, vintage café au lait 3009, sable 323 ou lin naturel clair 53
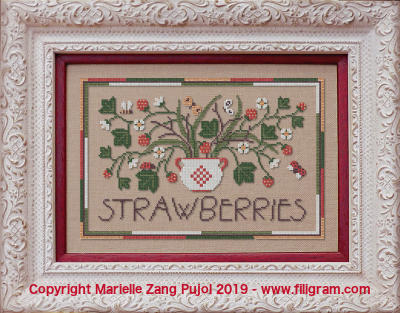 ref F135- Strawberries
Dimensions: 159 x 105 points- 6 couleurs
ref F135- Strawberries
Dimensions: 159 x 105 points
Point de croix
Légende couleurs: The Gentle Art, Dinky-Dyes et DMC - 6 couleurs
Toile suggérée: Lin Belfast de Zweigart
Coloris: café au lait 309, vintage café au lait 3009, sable 323 ou lin naturel clair 53
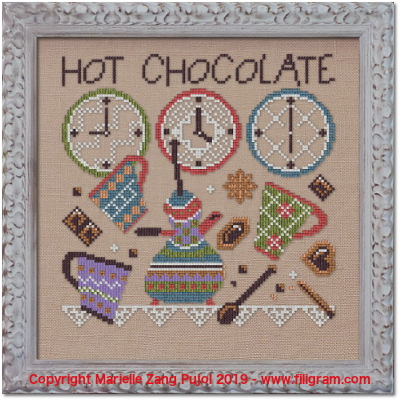 ref F139- Hot Chocolate
Dimensions: 102 x 102 points- 8 couleurs
ref F139- Hot Chocolate
Dimensions: 102 x 102 points
Point de croix
Légende couleurs: The Gentle Art, Dinky-Dyes et DMC - 8 couleurs
Toile suggérée: Lin Belfast de Zweigart
Coloris: café au lait 309, vintage café au lait 3009, sable 323 ou lin naturel clair 53
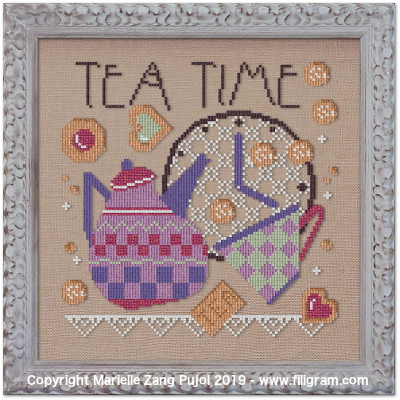 ref F134- Tea Time
Dimensions: 102 x 102 points- 8 couleurs
ref F134- Tea Time
Dimensions: 102 x 102 points
Point de croix
Légende couleurs: The Gentle Art, Dinky-Dyes et DMC - 8 couleurs
Toile suggérée: Lin Belfast de Zweigart
Coloris: café au lait 309, vintage café au lait 3009, sable 323 ou lin naturel clair 53
 ref F151- Christmas Ornements
Dimensions: 140 x 103 points- 6 couleurs
ref F151- Christmas Ornements
Dimensions: 140 x 103 points
Point de croix
Légende couleurs: The Gentle Art, Dinky-Dyes et DMC - 6 couleurs
Toile suggérée: Lin Belfast de Zweigart
Coloris: café au lait 309, vintage café au lait 3009, sable 323 ou lin naturel clair 53
 ref F146- Pré aux Fleurs
Dimensions: 109 x 163 points- 7 couleurs
ref F146- Pré aux Fleurs
Dimensions: 109 x 163 points
Point de croix
Légende couleurs: The Gentle Art, Dinky-Dyes et DMC - 7 couleurs
Toile suggérée: Lin Belfast de Zweigart
Coloris: café au lait 309, vintage café au lait 3009, sable 323 ou lin naturel clair 53
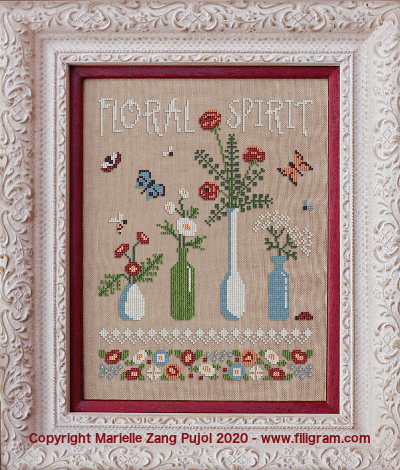 ref F140- Floral Spirit
Dimensions: 107 x 141 points- 8 couleurs
ref F140- Floral Spirit
Dimensions: 107 x 141 points
Point de croix
Légende couleurs: The Gentle Art, Dinky-Dyes et DMC - 8 couleurs
Toile suggérée: Lin Belfast de Zweigart
Coloris: café au lait 309, vintage café au lait 3009, sable 323 ou lin naturel clair 53
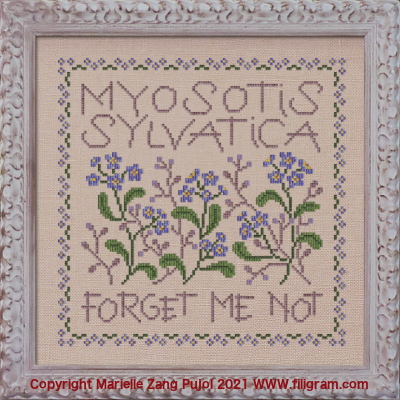 ref F149- Myosotis Sylvatica
Dimensions: 122 x 122 points- 6 couleurs
ref F149- Myosotis Sylvatica
Dimensions: 122 x 122 points
Point de croix
Légende couleurs: The Gentle Art, Dinky-Dyes et DMC - 6 couleurs
Toile suggérée: Lin Belfast de Zweigart
Coloris: café au lait 309, vintage café au lait 3009, sable 323 ou lin naturel clair 53
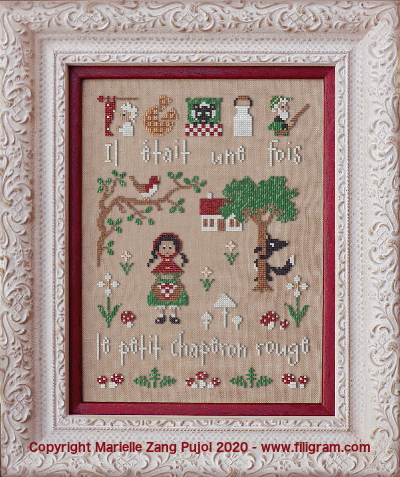 ref F141- Le Petit Chaperon Rouge
Dimensions: 105 x 145 points- 7 couleurs
ref F141- Le Petit Chaperon Rouge
Dimensions: 105 x 145 points
Point de croix
Légende couleurs: The Gentle Art, Dinky-Dyes et DMC - 7 couleurs
Toile suggérée: Lin Belfast de Zweigart
Coloris: café au lait 309, vintage café au lait 3009, sable 323 ou lin naturel clair 53
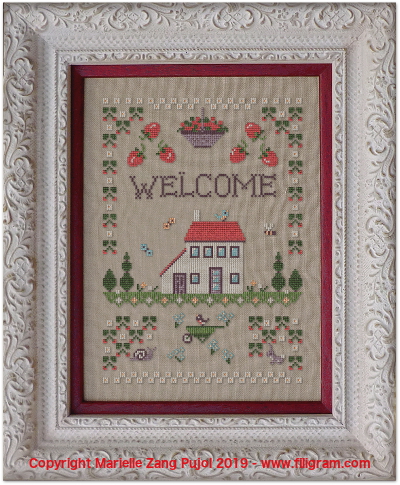 ref F137- Maison aux Fraises
Dimensions: 107 x 156 points- 8 couleurs
ref F137- Maison aux Fraises
Dimensions: 107 x 156 points
Point de croix
Légende couleurs: The Gentle Art, Dinky-Dyes et DMC - 8 couleurs
Toile suggérée: Lin Belfast de Zweigart
Coloris: café au lait 309, vintage café au lait 3009, sable 323 ou lin naturel clair 53
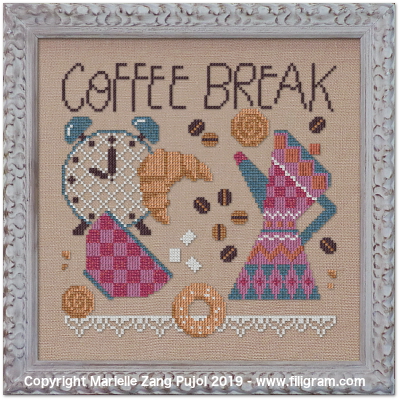 ref F133- Coffe Break
Dimensions: 102 x 102 points- 8 couleurs
ref F133- Coffe Break
Dimensions: 102 x 102 points
Point de croix
Légende couleurs: The Gentle Art, Dinky-Dyes et DMC - 8 couleurs
Toile suggérée: Lin Belfast de Zweigart
Coloris: café au lait 309, vintage café au lait 3009, sable 323 ou lin naturel clair 53